By Ben Stowe, CTS - “Sound & Lighting Guru”
 When it comes to providing sound for an event, few things are as important as the level and clarity of the sound. One without the other doesn’t get the job done.
Loud, inarticulate sound is blaring and offensive to the listener. Clear, articulate sound that’s not loud enough to hear is, well… not loud enough to hear.
Sound levels can be subjective, and are almost always situational. Different events, and different parts of an event may call for different levels.
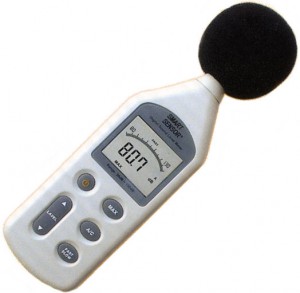
Measuring Sound Levels in Decibels
Sound levels are measured in decibels, symbolized as dB. It is a universal measurement that helps quantify the sound levels we experience. Every 10 decibel increase represents a change of double the sound level.
Decibels are often subject to weightings for the measurements. An “A” weighting is typically found when measuring occupational sound levels, but isn’t very useful for determining how effectively we’re producing sound for an event.
I recommend either using an unweighted scale, or the “C” scale which much more closely follows a full bandwidth of hearable sound. Almost every decibel meter will have a selector setting for this.
The Point of Measurement
Another important consideration is the point of measurement. Sound will decrease by approximately 6dB for every doubling of distance. If the sound level at your loudspeaker is 100 dB at 1 meter, it will be 94 dB at 2 meters, 88 at 4 meters and so on.
Sound pressure level (SPL) of music inherently varies greatly. Therefore, we typically average our SPL measurements, rather than simply measuring a peak.
The amount of time I assign as an average depends on the program material I’m using, but usually a couple of seconds is more than adequate to achieve a very accurate average. Many audio measurement tools have a “Fast” and “Slow” setting. For our purposes “Slow” is almost always the best choice.
It is also important to understand our measurement point in relation to the listening position. I usually take measurements at about 4’ from the floor level, and I will usually take several in different areas to see what kind of level variation we have since we know it will change with distance.
Where L = Loudness and D = Distance we can calculate this loss using this formula: L = 20log(1/D).
Sound Level Changes to Make
Some levels we might find appropriate for our events might be as follows, but bear in mind that these are generalized suggestions.
Cocktails & Dinner – 80 dBC
Wedding Dancing – 90 - 100 dBC
School or Club – 95 - 115 dBC
An important note to consider are the health effects from exposure to loud sound. Exposure to loud sound can cause permanent hearing loss.
For more information on this, you may reference information from OSHA or NIOSH, or there is a wealth of information on my Geek Boot Camp DVD. To locate a retailer that carries it, please visit www.proacademyseries.com.
Can You Hear Me Now?
Intelligibility and clarity can be much more complex given that sound travels in waves. Each frequency produces a different wavelength, and how these waves interact with the listening environment and each other will determine the overall quality of sound.
The Horn in Your Loudspeaker
To simplify this we’ll focus on the high frequency device in your loudspeaker, often called the “horn.” The high frequencies produced by this device are very small wavelengths, which are easily blocked or absorbed. Therefore, it’s essential that these horns have a largely unobstructed path to the listeners.
Whenever I see a DJ set their speakers on the floor I struggle with the inner conflict of enduring muffled, muddy sound all night or going up to the DJ and being “That guy.”
To date, I’ve always chosen to respect the event and just endure the sound, but one of these days I’ll probably snap. Please, for my sake, if you’re aiming your horns at people’s knees, just try aiming at their ears one time instead and see what happens.
Typically horns found in DJ speakers have a wider horizontal coverage than vertical coverage. This is intentional, because when placed on a stand we want to cover a lot of the room to the left and right of the speaker, but we don’t need to cover much above and below the speaker.
Sound energy directed up eventually hits the ceiling, and sound energy directed down eventually hits the floor. Neither place does us much good when it comes to entertaining people.
Take note of the horn pattern in your loudspeaker, and place it accordingly. In the simplest terms, point the loud part at the people.
Physics is Your Friend
Understanding the basic physics of sound, and using its principals to your advantage will ensure that you better meet your clients needs with clear, intelligible sound at adequate levels. This leads to an overall better experience for their guests, and likely more recommendations for you as an entertainer.
PUBLISHERS NOTE: If you’re not a fan of math, relax. Just send Ben an e-mail c/o [email protected], and he’ll send you a spreadsheet that allows you to calculate all sorts of fun audio things. Also, for a full “geek” version of this article, of write to us c/o [email protected], and we will gladly send it to you.
